Guides / Design and Fit
Screw Bosses, Inserts and Tapped Holes in a Keyboard Case
October 19, 2026

A keyboard case has a lot of small threaded holes for how little metal there is around them. Screws hold the top to the bottom, the PCB to its standoffs, the weight to the base and sometimes a plate to a mounting shelf. Each hole is a thread cut in a boss only a few millimetres across, in a part that someone will open and close many times.
Threads are also where a case wears out first. A stripped thread in a one-off prototype is an annoyance. The same fault in two hundred shipped cases is a support queue. This guide covers the choices: direct thread, wire insert or press-in insert, plus what each needs from the design.
Option 1: tap the aluminium directly
Cutting the thread straight into the case metal is the cheapest option and the default for most designs. Aluminium alloys such as 6061 hold a clean thread, and a standard metric screw seats well.
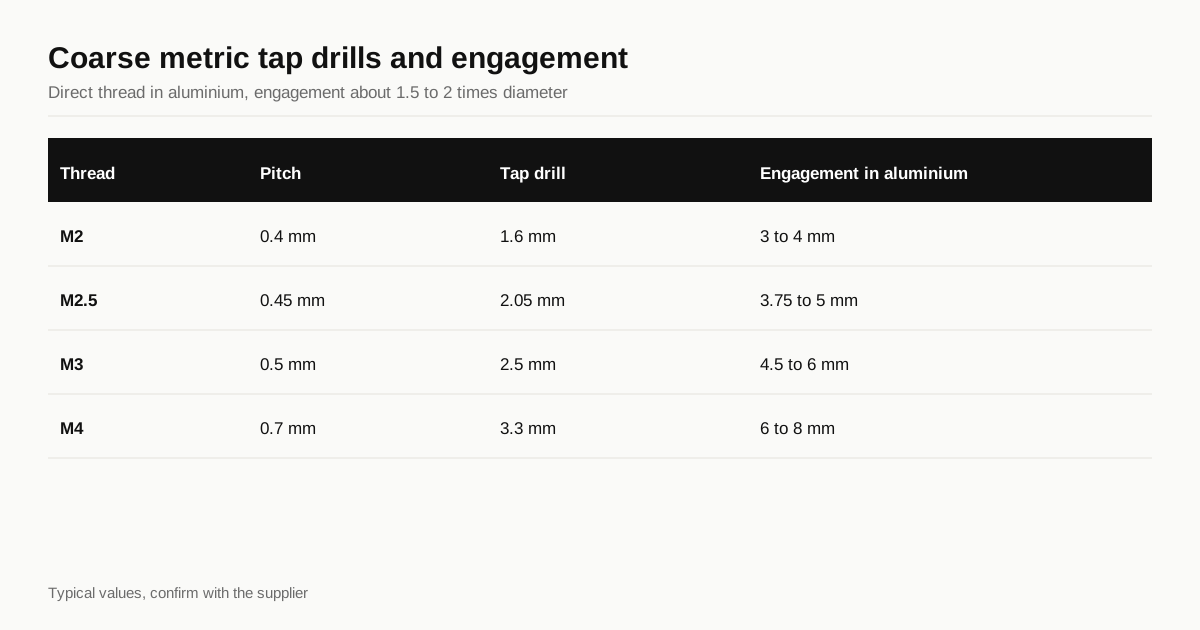
A thread is only as strong as its engagement, which is the length over which screw and thread overlap. A common rule for aluminium is an engagement of about one and a half to two times the screw diameter. For an M3 screw that is roughly 4.5 to 6 mm of thread. If the boss is too short to allow it, the thread strips before the screw reaches its working load.
These tap drill sizes are standard for a coarse metric thread.
| Thread | Pitch | Tap drill | Typical engagement in aluminium |
|---|---|---|---|
| M2 | 0.4 mm | 1.6 mm | 3 to 4 mm |
| M2.5 | 0.45 mm | 2.05 mm | 3.75 to 5 mm |
| M3 | 0.5 mm | 2.5 mm | 4.5 to 6 mm |
| M4 | 0.7 mm | 3.3 mm | 6 to 8 mm |
The drill is cut deeper than the thread, since a tap needs room at the bottom of a blind hole and chips need somewhere to go. A shop will normally add two or three thread pitches of extra depth.
Some shops use thread forming taps, which push the metal into shape instead of cutting it. The thread is stronger and no chips are made, but the drill size is different, and the shop must choose it. If you specify a thread, do not specify a drill size too. Let the shop pick the process.
Option 2: wire thread inserts
A wire thread insert is a coil of stainless steel wire in the shape of a thread. The shop drills and taps an oversize hole, winds the coil in. The screw then runs in the steel coil, not the aluminium.
The benefits are real. The steel coil is much harder than the case, so it survives repeated assembly and spreads load across more of the thread. A stripped thread can also be repaired.
The costs are also real. The hole is larger than a plain tapped hole, so the boss must be thicker. The insert is an extra part and an extra process step, and a poorly installed coil can back out when a screw is removed. On a small case with narrow bosses it is often impractical.
Option 3: press-in and self-tapping inserts
Solid inserts are a sleeve with a thread inside and an outside surface made to hold in the host material. Common types are:
- Press-in or knurled inserts. Pushed or driven into a plain drilled hole. The knurl bites the wall. They suit plastics and thin sections.
- Self-tapping inserts. The outside is a cutting thread, so the insert is screwed into a drilled hole and locks in place. These are common in aluminium.
- Heat-set inserts. Warmed and pressed into a plastic hole, where they melt a seat for themselves. These are the standard approach for polycarbonate and acrylic.
They carry more load than a bare thread and are widely used in plastic cases. In aluminium they are less common because the metal holds a thread well, but they are worth it for locations that see heavy torque or frequent rebuilds, such as a weight screw or a top-to-bottom fixing point.
Choosing between them
| Option | Strength and wear | Cost | Boss size needed | Best for |
|---|---|---|---|---|
| Direct tapped thread | Good, wears with many rebuilds | Lowest | Smallest | Most aluminium cases |
| Thread forming tap | Better than cut thread | Low | Small | Aluminium with many rebuilds |
| Wire thread insert | Very good, repairable | Moderate | Larger | High-wear points |
| Self-tapping insert | Very good | Moderate to high | Larger | Weights, heavy torque points |
| Heat-set or press-in insert | Good in plastic | Moderate | Moderate | Plastic and acrylic cases |
The pattern across most keyboard builds is plain. Use direct threads wherever the load is light and the boss is small, and put an insert in the two or three places that are opened constantly. A hobbyist rebuilds a keyboard many times, so the top-to-bottom screws take more abuse than anything else in the design.
Sizing the boss
A screw boss is a short tube of material around the threaded hole. Its size controls whether the thread holds and whether the surface cracks or bulges.
- Outside diameter. A boss wall of at least about 1.5 mm around the tapped hole is a practical minimum, which gives an outside diameter of about 5 to 6 mm for an M2 and 6.5 to 7.5 mm for an M3.
- Height. Tall, thin bosses vibrate while being cut and can bend. Keep them as short as the design allows.
- Fillet at the base. A small radius where the boss meets the floor strengthens it and gives the cutter an easier path.
- Position. Place bosses so they line up with the PCB mounting holes you are using. The tolerances guide explains why a screw pattern is a position tolerance and not a size tolerance.
If the case is made of polycarbonate or acrylic, bosses need thicker walls and rounded roots to avoid cracks. See machining polycarbonate keyboard cases for the reasons.
Threads and anodising
Anodising grows a layer on every surface, including the walls of the threaded hole, and the layer tightens a fine thread. For an M2 or M2.5 screw, the change is large enough to matter.
Shops use three approaches:
- Mask the holes. Plugs keep the anodic layer out, and the thread stays as cut.
- Tap after anodising. The thread is cut through the finished surface, and the bare thread has no coating. Chips and tap marks on a cosmetic face are a risk.
- Allow for the coating. A slightly oversize tap or a chase of the thread after anodising gives clearance.
None is wrong and the choice depends on the shop. The point is to ask. A thread that was tapped to size and then coated will bind, and the first sign is a screw that stops a few turns short of seating, which on a visible surface can leave a mark. The finishing details are in anodising keyboard cases.
Torque and screw choice
The best thread is wasted if the screw is overtightened. Aluminium threads strip long before the screw head does, and a small driver gives little feel. Practical habits help:
- Specify a screw length that stops short of the bottom of a blind hole.
- Use screws with a clean, undamaged thread. A burred screw damages a good tapped hole.
- Tighten by feel to snug. A small driver and moderate force are enough for a case, and torque numbers are rarely needed.
- Do not mix screw types. A different pitch or a different thread class can look the same and bind.
If the case is sold to buyers who will open it, include a note in the manual about screw order and torque. It prevents far more damage than a better thread does.
What to write on the drawing
A clear callout names the thread, the depth and the finish treatment. For example: “M3 x 0.5, 6H, depth 6 mm full thread, blind hole, tap after anodise” gives the shop everything it needs. Use the drawing callouts reference for wording, and add the position tolerance for hole patterns that must match a PCB.
Before you order
- Screw sizes chosen and consistent across the case
- Engagement length at least one and a half times the diameter
- Boss wall of about 1.5 mm or more around each hole
- Inserts specified at the high-wear points
- Thread treatment around anodising stated on the drawing
- Screw length checked against hole depth
If your design has a thread layout worth reviewing, send it through the RFQ form and we will match it with shops that tap and insert cosmetic cases every week.
Frequently asked questions
Can I tap threads directly into an aluminium keyboard case?
Yes, and most cases do. Threads in 6061 handle normal assembly well. They wear if the case is opened many times or if a screw is overtightened, which is when an insert is worth the cost.
Do threaded holes survive anodising?
Anodising adds a thin layer inside the hole, which tightens a fine thread slightly. Shops either mask the holes, tap after anodising or choose a tap size that allows for the coating. Tell the shop which one you want.
What size screws are common in a keyboard case?
M2, M2.5 and M3 cover most case screws, standoffs and weights. M2 and M2.5 are common for small boards and bosses, and M3 for weights and top to bottom fixing, but the screw size follows the PCB and the design.
Need a quote for your case?
Send the files. We match you with up to 3 shops that machine keyboard cases and reply within 24 business hours.
Get matched with a keyboard case shop