Guides / Finishing
Two Colours on One Case: What Masking Adds to an Anodised Run
November 5, 2026
A two tone anodised keyboard case is one of two different jobs, and the quote depends on which one you mean. In the first, the top and the bottom are separate parts, each anodised in its own colour and then assembled. That is an ordinary run with two lots. In the second, one part carries two colours, which needs masking and a second dye pass. Shops do the first every day and few do the second well, so name the job before you ask for a price.
This guide covers the ways to get two colours on a case, how the masked method works, the failure points finishers report and what to put in the order. The process notes come from practitioner threads on finishing.com and from Wikipedia. They are directional. No standard or public price list governs two-colour work on keyboard cases, so the way to settle the details is a sample from the shop that will run yours.
Four ways to get two colours
| Method | What it is | Process risk | Cost effect |
|---|---|---|---|
| Two parts, two colours | Top and bottom (or case and weight) anodised in separate loads, then assembled | Low. The risk is matching each colour between lots | Small. Two lots instead of one |
| One part, two colours by masking | One area masked, the rest dyed and sealed, then the mask comes off and the exposed area is anodised and dyed again | High. Seal, mask and re-clean must all hold | Large. Extra cycles and more scrap |
| One colour, two textures | Bead blast and a polished chamfer or flat face in the same dye | Medium. Texture changes how the dye reads | Moderate. See the edge and blast guides |
| Second colour from another finish | Anodised body with a PVD, Cerakote or coated accent | Medium. A different supplier and a different match problem | Moderate to large |
Most “two-tone” cases on the market are the first row or the third. The case-and-weight look, where a coloured case carries a contrasting weight, is two parts and two lots. If that gives you the look, stop there.
How the masked method works
Finishers on finishing.com describe the same basic sequence for dyed anodising. One answer, dated 2010, gives it in steps. The part is anodised and dyed all over in the lighter colour, then sealed. The area that must keep the lighter colour is masked. The exposed area is dipped briefly in dilute nitric acid to break the seal there. After a rinse it is dyed in the darker colour and sealed again.
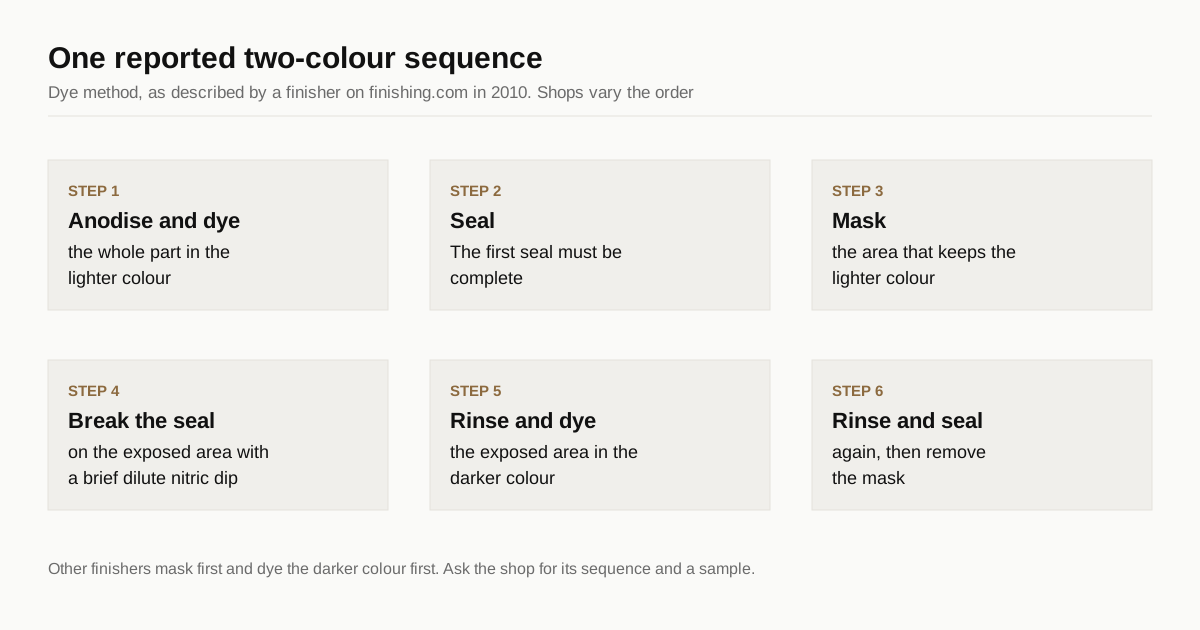
Other answers in the same threads describe a different order. One suggests masking the area, anodising and dyeing the rest, then removing the mask, abrading the exposed area and anodising it again. A third, for a part with a machined second area, anodises, dyes and seals the whole part, masks it fully, machines the second area and then anodises that area in the second colour.
The finishers do not agree on which colour goes first. One contributor writes that the lighter shade is typically applied after the darker, because lighter shades need less coating thickness and a shorter immersion. Another dyes the lighter shade first and breaks the seal later. Both are practitioners describing their own bench. Treat the disagreement as a reason to ask the shop for its sequence and to see a sample, not as something you can settle from the drawing.
What goes wrong
Four risks come up in the finishing.com answers, and each maps to something you can ask about.
The first seal is the weak point. One contributor says the first anodise must be completely sealed before the second cycle and that most shops do not seal completely. A low-temperature seal fails even on the first day, in his account. Wikipedia adds that mid-temperature sealing at 70 to 80 °C uses additives that will likely leach the colours, which is the reverse of what a two-colour job needs. A leaching first colour bleeds into the second.
Cleaning between cycles can strip dye. The same contributor warns that re-deoxidising before the second anodise can leach the earlier dye, so the deox time has to be tested. If any machining sits between the cycles, a water-soluble cutting fluid and a careful rinse are needed before the part goes back in.
The mask is a material choice. Options listed include elastomer dips, brushable stop-off, dipped wax and plater’s tape. Wax is limited to warm dyes and no heated cleaning or sealing, and a laser-etched part may need cleaning at temperatures wax cannot take. A well-sealed anodic film can itself work as a maskant against further dyeing, with possible limits. Masking the finished part for a later dye has had “mixed success” in one answer.
Colour does not mix on paper. A hobbyist notes that dye colours on aluminium do not always follow normal colour mixing. A second dye over a first, or at the boundary, can give a third colour you did not plan. Always see the pair on a coupon from your alloy.
One contributor sums up the economics: masking the first coat and re-anodising is an option but in most cases not cost effective. In the same threads the site owner advises anyone with a multi-colour job to find a shop that has done two-colour work before. The answers date from 2008 to 2022, so shop practice may have moved, but they explain why a two-colour line on a keyboard case is rare and why the quote is not small.
Design the boundary for the mask
A mask is only as good as the edge it sits against. These points are practice, not a published rule, so ask your shop whether they suit its method.
- Put the colour line on a geometry change. A step, a shallow groove or a chamfer gives a mask something to stop at, and the line then reads as design. A line drawn across a flat face shows every wobble and every bit of bleed.
- Keep the boundary away from the viewing face if you can. A split on the side wall or the bottom edge forgives more than a line across the top.
- Avoid sharp internal corners at the line. Dye and solution pool in recesses, which also feed the spot defects described in the anodising defects guide.
- Decide where the rack and mask contact marks may fall. Say which faces are cosmetic, as in the cosmetic standard guide.
Cheaper routes to the same look
If the goal is contrast and not a pure two-colour part, three options avoid masking.
- Two parts. A case top in one colour and a bottom or a weight in another. Ask for both from one lot of metal if you want the tones to relate, and see why the colour shifts in anodising.
- Texture contrast. A bead blasted face beside a polished chamfer in one dye. The bead blasted guide and the diamond cut edge guide cover the cost and scrap of each.
- Engraving through the colour. A laser mark removes the dyed film to bare metal, as covered in the laser engraving guide. It gives a small second tone in a badge or a legend and no mask.
For a white accent, anodising cannot do it, and the e-white guide explains the coated alternative and its match problem.
What to put in the order
- Say whether the job is two parts or one part with two colours.
- Name both colours and the order they are applied, if the shop has a preference.
- Mark the boundary on the drawing and give an allowed line wobble and bleed.
- Ask for a sample coupon in your alloy, from the stock you will use, with both dyes on it.
- Agree a scrap and overage rule up front, because the second cycle puts a finished part at risk. How scrap is priced shows the shop side.
- Ask who runs the masking, since a machine shop that outsources anodising may outsource the mask too, and that adds a hand-off.
If you want shops to quote the masked version against the two-part version, send the drawing through the RFQ form and mark both options. We match the request with up to 3 shops and reply within 24 business hours.
Sources
- finishing.com, two-color anodizing (reader Q&A, 2001 to 2022)
- finishing.com, two-tone anodizing by the dye method (reader Q&A, 2010)
- Wikipedia, anodizing
The finishing.com answers are practitioners’ opinions and are labelled directional. Agree the process and the cosmetic limits with your shop in writing.
Frequently asked questions
How is a two-tone anodised keyboard case made?
There are two routes. The simple one anodises the top and the bottom as separate parts in different colours, then assembles them. The harder one puts two colours on a single part, which means masking one area, dyeing and sealing the rest, then removing the mask and anodising and dyeing the exposed area again.
Why is a two-tone anodised case more expensive than a single colour?
Every extra colour is another anodise, dye, seal and masking cycle on a part that must stay clean between steps. Practitioners on finishing.com call masking and re-anodising an option that is in most cases not cost effective. There is no public price list, so ask each shop to quote it as its own line.
Can a two-tone case include white?
Not as a dyed anodised colour. Wikipedia notes that white cannot be applied by anodising because the dye molecules are larger than the pores of the oxide layer. A white section needs a different finish, such as an opaque coating, which adds another process to the run.
How do I get a crisp line between the two colours?
Put the boundary on a geometry change such as a step, a groove or a chamfer, so the mask edge has something to sit against. Then write the allowed bleed and line wobble into the cosmetic standard. Hand masking and dye bleed make a perfect line on a flat face hard to promise.
Need a quote for your case?
Send the files. We match you with up to 3 shops that machine keyboard cases and reply within 24 business hours.
Get matched with a keyboard case shop